Note: This is an update to a post from 2019 and features a rewrite in Python with various new features including IPv6 support, logging, argument parser, …
Why
I’m using Cloudflare as CDN and DNS provider as well as domain registrar. For a system with an external IPv4 address that changes daily I needed a way to dynamically update a DNS record at Cloudflare with the system’s current external IP address.
There are numerous ways to do DynDNS but I wanted to get into Cloudflare’s API anyway and it turns out that this is, at least in my opinion, much easier to set up than some generic DynDNS package.
How
Getting the script
I’ve written a Python script, based on a bash script by benkulbertis.
The Python script does not require a general API token. So you can set up API tokens specifically authorized for what the script needs to do.
You can get the script here.
wget https://raw.githubusercontent.com/va1entin/tools/master/cloudflare_update_record/cloudflare_update_record.py
Setting up API tokens
The script needs two tokens:
- one to read DNS records and settings
- one to actually edit a DNS zone
To set the tokens up, log in to your Cloudflare account and go to this page.
Note, that you can also limit the tokens to a specific domain! This is of course important to know if you have multiple domains in your Cloudflare account and the script shall only read/edit the settings of one of these.
Edit token
On the API token page, click Create Token and use the template Edit zone DNS.
Alternatively, click Get started next to Create Custom Token and configure the token as follows:
| Type | Resource | Permission |
|---|---|---|
| Zone | DNS | Edit |
Click here for a screenshot.
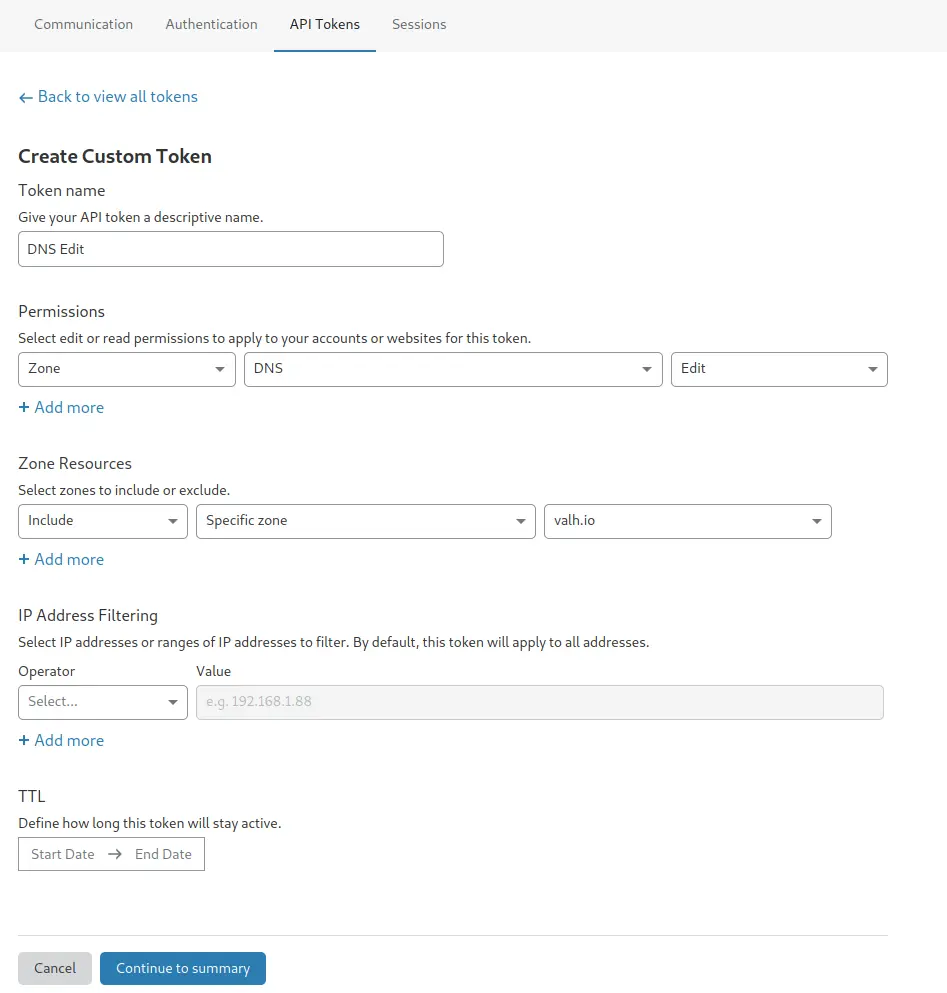
Read token
On the API token page, click Create Token and click Get started next to Create Custom Token.
| Type | Resource | Permission |
|---|---|---|
| Zone | DNS | Read |
Click here for a screenshot.
Create config file
The script uses a YAML-format config file and assumes it at ./cloudflare_update_record_config.yaml. You can give a different path using the -c | --config parameter.
read_token: "<YOUR READ TOKEN>"
edit_token: "<YOUR EDIT TOKEN>"
zone_name: "<YOUR ZONE NAME>"
record_name: "<YOUR RECORD NAME>"
So if I wanted to change a DNS record called hello.example.com using a read token foo and an edit token bar, the config would look like this:
read_token: "foo"
edit_token: "bar"
zone_name: "example.com"
record_name: "hello"
To change the root record of your domain - example.com itself - use @ as record_name, just like in the Cloudflare dashboard:
read_token: "foo"
edit_token: "bar"
zone_name: "example.com"
record_name: "@"
Run script
Lastly run the script with your desired parameters. I recommend reading the brief usage info at least once:
./cloudflare_update_record.py -h
Logging
The scripts logs to cloudflare_update_record.log with log level info by default. You can change the log file and log level, see -h.
IP provider
It gets the external IP address from a provider, by default: icanhazip.com
You can specify a different provider, see -h.
The provider must return just the IP address as plain text on a HTTP GET request - no additional HTML or anything else. Assuming an external IPv4 address 1.1.1.1, it should look like this, when tested with curl:
# curl https://ipv4.icanhazip.com
1.1.1.1
Update a DNS A (IPv4) record
cloudflare_update_record.py -4
Update a DNS AAAA (IPv6) record
cloudflare_update_record.py -6
Check the log for a message INFO: DNS A record update succeeded, IP changed to: <YOUR IP ADDRESS>
and remember that it might take up to 24 hours for your DNS update to be propagated around the world.